Showing posts with label spray paint. Show all posts

Saturday, February 9, 2013

{Craft This}: Spray Paint Brands.


I've been doing a lot of spray painting lately with my crafting hobby. What I've learned is that spray paint brands are not made the same. Some go on smooth and strong while others need about 400 coats to look presentable.

Another issue with spray paint is the color choice. At our Home Depot, the choices are slim in terms of cute colors. You go to Lowe's and it is like a color rainbow... it is amazing. Why is it that spray paint can't come in 200 colors? Is that too much to ask?

Two projects I've done recently involving spray paint are a birthday card/picture holder for my upcoming craft fair and some picture frame memo boards:


For these projects I've used three brands and four types of spray paint: Rustoleum (regular and painter's touch), Krylon, and Valspar.


After repeated use, I can tell you that by far my favorite brand is the Valspar. It goes on incredibly easily, doesn't drip, needs only two coats, and has good coverage. The Rustoleum is fine, works well, but is splotchy for the first few coats. The Krylon? Well I'll never buy it again. It was more expensive and it doesn't go on well at all. In the picture below these boards each have one coat. The pink with one coat is almost entirely covered (I did another coat but only needed one). The green is the Krylon and it needed 4 coats to show up. #disappointing


Home Depot carries Rustoleum and Lowe's carries Valspar. Valspar has many more colors to chooce from but for us Lowe's is a longer drive... so I guess I'll suck it up and buy Rustoleum in a pinch. But never Krylon. Never.


Tuesday, October 16, 2012

{House}: Some finishing touches...

Way back in April of 2011, I blogged about my "reveal" of our kitchen:
http://www.makinitinmemphis.com/2011/04/kitchen-renovation-reveal.html


The reveal didn't really get much traffic until it was highlighted on two blogs - the first one was Better After, a great blog of before and afters:
http://www.betterafter.net/2011/05/yellow-fever.html

The second blog was Young House Love, which absolutely rocked my world. I still can't believe John and Sherry shared my kitchen with their world!

My post about it:  http://www.makinitinmemphis.com/2011/11/oh-hey-john-and-sherry.html
Their post about my kitchen: http://www.younghouselove.com/2011/11/reader-redesign-ranch-re-kitchened/

At some point someone made a comment about the space above our refrigerator and it made me realize something that has been bothering me ever since...


The commenter mentioned how the space above the refrigerator looked bare and that I should put something up there. Ever since I've been thinking about what to do.

A few months ago I decided I wanted to put a shelf above the fridge. I decided to look for one at IKEA when I went to Atlanta this summer. While down there, I came up with the idea of buying brackets and making a shelf:

The brackets that I bought were the Ekby Valter. I bought three of them and they sat around the house for the next few months. And then I got a wild hair and decided to finally make a shelf for the area.

We had let the stuff pile on up top of the fridge and it was getting a little embarrassing... Here's a true before:


So it was off to Home Depot. I got a board cut to size (measured the fridge and made it just a bit wider than the fridge) from the lumber department. I wanted something that was 12 inches deep so it would mimic the upper cabinets of our kitchen and not look too shallow atop the fridge. I also got a smaller piece of wood to make a lip to beef up the shelf and some Power Grab (recommended at Home Depot instead of Liquid Nails) to make my shelf.


I took the glue and dabbed it on the bottom of the small wood piece and held it in place for a few minutes and then left it alone for a few hours. When I checked on it, the shelf was holding in place excellently.

The next step was to spray paint the shelf. While at Home Depot, I finally caved and bought these little Painter's Pyramids and I have to say I'm so glad I did. It really helped with this project and getting paint on the bottom of the shelf.


One last picture of the shelf before I spray painted - notice the lip that I glued on?


I picked a black spray paint with primer in the paint. First I did a thin coat to start off:


The key is leaving it alone for a while to dry. Here is after the second coat (and flipping the brackets):


After letting the shelf dry overnight, I put my guy to work. First he mounted the brackets to the wall and then drilled the shelf into the brackets:


Once the fridge was pushed back against the wall, I added a print from zulily I bought over the summer specifically for this project (with a cheap frame from Michael's) and two canisters that we had in the kitchen.


I love the completed look this "finishing touch" on the kitchen gives the space. 


So over a year later, we finished yet another project in the kitchen. And I love the result!

Before:                                                                                      After:


In spraypaint and shelving,
post signature

Sunday, October 14, 2012

{Project}: Baby Dale Changing Table.

My cousin Amy and her husband Andrew are expecting baby #1, Layla Phoenix Dale, in December. This is the first baby of our side of the family for this generation and we're overjoyed! Amy and Andrew are going to make great parents and it has been fun watching them go through the process of preparing for Layla.

Amy has a very cool modern style for her downtown condo. Cutesy baby stuff just wasn't going to do for her so she's been on the look for a changing table that would mesh with her style. The other limiting factor was that the wall for the changing table is on the smaller side, meaning they needed something less than 33 inches (the room will remain a guest room so space is at a premium).

Always down for the "hunt," I joined Amy a few months ago to run around Summer Avenue in the hopes of finding something we could rehab. We had no such luck that weekend (but had a lot of fun!) and so since I was in on the quest, I kept the vision in the back of my head for when I was out antiquing. Goodness knows I love a good find.

So a few weekends ago my mom and I went to the Les Passes Stock Exchange (it runs every year from September to November and is a consignment sale to benefit charity) and hadn't found much. I was standing waiting for my mom and was checking out mirrors when I realized that the mirrors were leaning against an entertainment cabinet from the 60's:


You couldn't even really tell what it was - it was facing the wall and had mirrors propped up against it. But once I got it out in the open I could tell it was going to be a winner. And best part? $40 for this baby! It was scuffed up on the top and the back isn't wood (it is some sort of board with holes for cords) but I texted this picture to Amy to see if she liked it:


She said she did and we were off! The doors slide open and closed, which is good because Amy says she's putting diapers and other "not cute" (her words) things in it and she can just close the doors and let it be!

After a false start due to rain, Amy and Andrew came over to our place to paint it. Her nursery colors are based on this inspiration from Apartment Therapy:


(entire nursery from Apartment Therapy found here: http://www.apartmenttherapy.com/post-140-155697)

So when it came to picking what color to paint the changing table, she looked to that inspiration and chose turquoise! With their spray paint clothes on (it is worth mentioning that Amy usually does not dress in monotone grey sweat attire - she is very cute!), they got down to business. First they sanded the changing table and took the doors and top off of it.

Then it was time to spray paint. They primed the piece inside and out:


Then gave the first coat of blue. It is important to do thin, even coats when spray painting. And patience is a virtue in life but is especially a virtue in spray painting. Wait for the coat to dry before putting on the next coat. And sand between coats. It really does help even though you feel like you're moving backwards.


As you can tell from the picture above, Andrew had the idea of putting the doors into a circle standing up to get into the groves of the doors.

Time for coat two! (or was it three? or four? we lost count...)


Then once the last coat of the outside was on, it was time to roll paint the inside with white. Andrew wants you to know it was his idea to do the inside white. And what a good idea!


Time for a photo opp! While waiting for the inside first coat to dry, getting a little silly... A good shot of Layla in the belly there!


And all done and ready to go home to the condo... sent it home disassembled for ease of transportation.


And for the final product! Amy texted me this picture of the changing table sans changing pad in its new spot. Amy's mom (my cousin Beth!) gave her the print above it - isn't it the sweetest?


Once the nursery is fully done, Amy (being the photographer that she is) is going to set up lights and do a shoot of the space to document so I'll definitely link y'all to her site once that happens.

Makeover projects are always fun, but they are even more fun when you're doing them with family for a little baby on the way! Proves that if you are patient and creative, nurseries don't have to be cheesy or break the bank.

Now for a little before and after...
                     

In family and fun,

post signature

Wednesday, September 22, 2010

Christmas in September!

Back a few weeks ago on my Goodwill bonanza, I acquired this fun Christmas crate:
 $1.99 - I read on a blog somewhere that the best time to get Christmas stuff at Goodwill was off season, so I jumped on this deal so I could use my green spraypaint to turn it a bit cuter:
 

Monday, September 13, 2010

Spraypaint Saturday

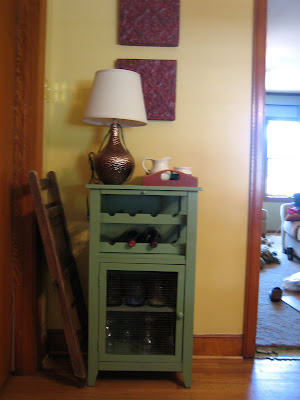
We have this little "curio cabinet" or something - I dont know what to call it. We use it as a mini-bar area because it has a wine rack and we can keep our glasses in it. Anyway. We bought it from target online for our old dining room because we needed extra storage. It ended up being (surprise) not exactly easy to build and now has a lean to it. Regardless, it has bothered me in our new house because it is dark cherry and all the other wood we have in our house is a honey oak. 

Here is the offending cabinet:
You can see it in action in our *lovely* kitchen, with the cabinet squeezed in the left there by the yellow bookshelf that holds our dog food and recycling. It wasn't doing much for me there and I have big plans for that area when the kitchen redo comes. 
 So on a sunny Saturday, this cabinet met its maker (and Beamer while it was at it) in the spray can. Here it is getting prepped:
 I learned from my last spray experience to tape the newspaper very firmly or else paint gets through (no fun). 
A little primer action...

And three coats of green later:
 It has a new lease on life. This color is the same as two of the dining chairs and fits well in this corner (there is a door there but we don't use it, as it seems odd to have a guest room lead into a dining room, especially when said guest room has three doors). I did scuff the edges a bit, making it look a little distressed.

Tuesday, August 31, 2010

Office Re-do

Way back when, Eric came to visit. We did a lot of things, namely eat good food, organize my coat closet, and stain a bunch of wood for shoe moulding and a desk. We got more done that weekend then I ever thought I could do. We (well, he) worked our butts off, with some trips to Home Depot and Target interspersed (and of course, Central BBQ). 

One of our big projects was an office makeover. With Jake in school, we use the office quite a bit and we wanted a bit L-shaped desk. These could be pricey so instead we built our own. Now, I haven't shown that in all these months because (believe it or not...) it isn't isn't "done." And by "done," I mean that the cork won't stay on the wall for my bulletin board and I'm going to have to go to plan d on that one. Plus some tidying is in order. Other parts of the office need help as well, as these cute decals I got for the wall over the futon have not stuck whatsoever. 

BUT, with the bad comes the good and so today I am here to share with you one project completed for the office.

Back in May I bought this chair at Gary's antiques on Central (a little junk store that calls itself an antique store). It has found its home in our office. I took a white shelf unit from the college days and spray painted it black (remember, I love spray painting things). We had my Nicholas Sparks collection to house (and assorted other novels of great importance) and some odds and ends - the baskets are from college days as well. I found the lamp at Walmart while shopping for yarn for a youth retreat. It was $15 (and that is a story...). 

We also are really excited to have a place to display Jake's grandfather's letter sweater from UT. He played on the 1951 National Championship team and Jake's parents have loaned this to us for our house. Since their house has become LSU territory for a bit, we've got to rep the Vols over here.  

Our colors for this room are orange, lime, and turquoise - so there are little pops here and there of those colors. I love bright colors!

Monday, August 23, 2010

On a spray paint kick.

I'm definitely on a spray paint kick. Advice about spray paint:


- if you want good colors and you're a midtowner, you have to go to East Memphis. Home Depot on Poplar at Avalon does not have the goods. Lowe's will change your life.


- buy the 2$ spray gun attachment. Really.

I have not been feeling our entry hall mirror for some time. Firstly, it is too small for the space. But short of buying a bigger mirror (and dropping $50+ already allocated to other home projects), I've been dealing. 

I decided to take my love of spray paint, though, and give my mirror a spiff up. Here she is!

Before:
 After:
 The lighter, painted look is much more me. I also decluttered a little by moving the platter to a different location where it is less likely to be knocked on the floor.

LinkWithin

Related Posts Plugin for WordPress, Blogger...
 
Site Design By Designer Blogs