Saturday, October 27, 2012

{House}: Add a little color...

We love our new(ish) kitchen. When I was planning it in my head, one of the things I HAD to have was those hanging bars from IKEA. In my head, that was critical to my overall polished look.

Just as a reminder, a little glimpse of what we started with here in the kitchen - stove circa 1950, original linoleum, and old cabinets with sweet hardware. Plus a little J towel to class the place up:


Here are my new IKEA bars, mounted in the kitchen right after we finished. Bad lighting but you can see how dorky the bars look without anything on them:


Here's the bars with these white ceramic hanging pots I bought from IKEA (I can't find them online now):


I bought the white planters thinking I could put herbs in them but soon realized that apparently living plants need sunlight to grow. What's up with that? So there they sat, dorky and empty.

Now, two years after planning, I finally have come up with a semi-viable purpose for those oh so cute hanging bars. For a bit now I've been on the search for the perfect thing to put in these white hanging planters.

As I have been making other little updates to our kitchen, I was keeping my eyes out for the right thing. I wanted some sort of pop of color and really would have liked a succulent or flower but knew that wasn't going to work.

The colors in the kitchen are coming forward to be mostly red, turquoise, and yellow:


And so the other day when I was at Michael's, I checked out their floral section. I'm not a fake flower kinda gal at all but I loved the look of these fake hydrangeas. I got three of them at $2.99 a piece and took the "flower" and "leaf" part off the "stem" and stuffed them into the white planters:


And for $9, my kitchen is one step closer to being complete. I'm really liking the fake flowers and may decide that they are allowed in certain situations. 

So here's to cost-effective solutions for kitchen decoration!

In coming to accept fake flowers,

post signature

Thursday, October 18, 2012

{Friends}: Elise and Nate are engaged!!

Elise is the person I've known third longest in the world (after my mom and my dad). She has been there for my entire life and she means the world to me. I sure am lucky our parents were friends! I've got so many memories of growing up with her, from eating out of ninja turtle cereal bowls to playing tennis to many many years of Choir Camp.


A few years ago our friend Ellen had the genius idea to introduce Elise to her pal Nate. And, as they say, the rest was history. We love Nate so much and I honestly could not have picked anyone better for Elise. Nate is a musician (music is very important to Elise), he is fit and active (Elise is very active), and most importantly he is extremely considerate, kind, and easy-going. All very wonderful qualities.

On Tuesday I got the great news I had been waiting for - Nate proposed to Elise! Elise and Nate are ENGAGED! They're getting MARRIED! I'm a little excited....can you tell?


Congratulations, you crazy love birds. I am so happy for you two and cannot wait to share the celebration of your union. Here's to a lifetime of happiness. Marriage is the best!

In best friends for life,

post signature

Wednesday, October 17, 2012

{House}: Bedroom Wall Art.

Way back in July I shared an idea for what I'd like to do in our back bedroom:


As is with most places, our bedroom has been one of the last rooms we have worked on. I was excited to freshen up the decor and add in some pops of yellow to the brown/red/turquoise color scheme.

A few weeks ago I shared the paint chip art I did for the frames:

Last weekend I followed that zero dollar art work up with a two dollar project - free printables from the internet!

After browsing Pinterest (what else?) I found these two printables and downloaded them to my computer:

http://tatteredandinked.blogspot.com/2012/01/week-of-valentines-printables-bushel-in.html

http://eighteen25.blogspot.com/2011/05/filler-print.html

I did an online order at Kinko's (sorry - FedEx Office) and for $2 printed them as 8X10s to put into my existing frames.


This simple update just makes our bedroom look a little more "hip" and young. Both of those sites I linked above had lots of printables that you can do too! One step closer in our back bedroom...

In printing fo' free,

post signature

Tuesday, October 16, 2012

{House}: Some finishing touches...

Way back in April of 2011, I blogged about my "reveal" of our kitchen:
http://www.makinitinmemphis.com/2011/04/kitchen-renovation-reveal.html


The reveal didn't really get much traffic until it was highlighted on two blogs - the first one was Better After, a great blog of before and afters:
http://www.betterafter.net/2011/05/yellow-fever.html

The second blog was Young House Love, which absolutely rocked my world. I still can't believe John and Sherry shared my kitchen with their world!

My post about it:  http://www.makinitinmemphis.com/2011/11/oh-hey-john-and-sherry.html
Their post about my kitchen: http://www.younghouselove.com/2011/11/reader-redesign-ranch-re-kitchened/

At some point someone made a comment about the space above our refrigerator and it made me realize something that has been bothering me ever since...


The commenter mentioned how the space above the refrigerator looked bare and that I should put something up there. Ever since I've been thinking about what to do.

A few months ago I decided I wanted to put a shelf above the fridge. I decided to look for one at IKEA when I went to Atlanta this summer. While down there, I came up with the idea of buying brackets and making a shelf:

The brackets that I bought were the Ekby Valter. I bought three of them and they sat around the house for the next few months. And then I got a wild hair and decided to finally make a shelf for the area.

We had let the stuff pile on up top of the fridge and it was getting a little embarrassing... Here's a true before:


So it was off to Home Depot. I got a board cut to size (measured the fridge and made it just a bit wider than the fridge) from the lumber department. I wanted something that was 12 inches deep so it would mimic the upper cabinets of our kitchen and not look too shallow atop the fridge. I also got a smaller piece of wood to make a lip to beef up the shelf and some Power Grab (recommended at Home Depot instead of Liquid Nails) to make my shelf.


I took the glue and dabbed it on the bottom of the small wood piece and held it in place for a few minutes and then left it alone for a few hours. When I checked on it, the shelf was holding in place excellently.

The next step was to spray paint the shelf. While at Home Depot, I finally caved and bought these little Painter's Pyramids and I have to say I'm so glad I did. It really helped with this project and getting paint on the bottom of the shelf.


One last picture of the shelf before I spray painted - notice the lip that I glued on?


I picked a black spray paint with primer in the paint. First I did a thin coat to start off:


The key is leaving it alone for a while to dry. Here is after the second coat (and flipping the brackets):


After letting the shelf dry overnight, I put my guy to work. First he mounted the brackets to the wall and then drilled the shelf into the brackets:


Once the fridge was pushed back against the wall, I added a print from zulily I bought over the summer specifically for this project (with a cheap frame from Michael's) and two canisters that we had in the kitchen.


I love the completed look this "finishing touch" on the kitchen gives the space. 


So over a year later, we finished yet another project in the kitchen. And I love the result!

Before:                                                                                      After:


In spraypaint and shelving,
post signature

Monday, October 15, 2012

{House} Happy 3rd House-iversary!

2009 was a great year for us. We got married (yay for commitment!), I started a blog, I returned to camp as assistant director, and we bought our first house. With interest rates at all time lows and the first time home buyers tax credit, we took advantage of a slowed market and low real estate prices and snagged our little rancher on a street of bungalows.

Our house-iversary is today, celebrating three years in this cute space we get to call our own. To take a trip down memory lane, here are our posts from the last three years:

Buying our house....http://www.makinitinmemphis.com/2009/09/big-news.html
Year 1 anniversary....http://www.makinitinmemphis.com/2010/10/homeowners-for-year.html
Year 2 anniversary....http://www.makinitinmemphis.com/2011/10/happy-two-year-anniversary-house.html

Here I am the first night we had our house, three years ago today:

And our house today...

We love our house, love our neighborhood. We walk to some of our favorite restaurants and take long walks around the neighborhood and down our green line.


While this year didn't bring a brand new kitchen, we did get a new door and window:
http://www.makinitinmemphis.com/2012/05/house-exterior-part-three.html

We also updated the dining room some more:
http://www.makinitinmemphis.com/2012/08/house-browser-window-shopping-for.html

and continue to chip away at the guest room chaos:

It is nowhere near perfect but it is better than how it used to be! You can see the floor and bed.

For funsies, it is always a good time to look back at pictures of when we toured the house (MLS photos) to now.

Before (2009 MLS photo of previous owner):
Now:


Before, 2009 MLS photo:

Now:


The kitchen in MLS photos, 2009:

And now...


The den from the week we moved in....

And now...


And a little panoramic fun...


Clearly there is still lots to do.. and there will be probably until we sell the house, whenever that will be. But isn't that the fun in it? Looking at our goal list for the house from last year, we partially accomplished two of our goals (the exterior and guest room) but didn't do the others... and probably won't until Jake's bringing in income instead of paying for school. But for the sake of posterity, a list for you of the things we have yet to do... in no particular order
  • posts for the front of the house to replace the wrought iron
  • paint or stain the door (still haven't decided!)
  • new windows for the front of the house and side of the house (?)
  • new shelving system for the pantry/re-organize and paint the pantry
  • drywall the den (remove panelling), new flooring for the den, white trim and grey walls to match the kitchen
  • either replace the back door OR put in french doors and convert door to window in den
  • widen the door between the den and dining room
  • paint the back bathroom, replace hardware on cabinets in both bathrooms, new counters in both bathrooms
  • clean up/organize office (solution for dog kennels?)
  • continue organization of guest room/craft room
Needless to say, we've got our work cut out for us! But I'm lucky because I've got a great guy along for the ride with me. And we're in this together. 

In celebrating three years of being massively in debt (oh and loving our house),
post signature

Sunday, October 14, 2012

{Project}: Baby Dale Changing Table.

My cousin Amy and her husband Andrew are expecting baby #1, Layla Phoenix Dale, in December. This is the first baby of our side of the family for this generation and we're overjoyed! Amy and Andrew are going to make great parents and it has been fun watching them go through the process of preparing for Layla.

Amy has a very cool modern style for her downtown condo. Cutesy baby stuff just wasn't going to do for her so she's been on the look for a changing table that would mesh with her style. The other limiting factor was that the wall for the changing table is on the smaller side, meaning they needed something less than 33 inches (the room will remain a guest room so space is at a premium).

Always down for the "hunt," I joined Amy a few months ago to run around Summer Avenue in the hopes of finding something we could rehab. We had no such luck that weekend (but had a lot of fun!) and so since I was in on the quest, I kept the vision in the back of my head for when I was out antiquing. Goodness knows I love a good find.

So a few weekends ago my mom and I went to the Les Passes Stock Exchange (it runs every year from September to November and is a consignment sale to benefit charity) and hadn't found much. I was standing waiting for my mom and was checking out mirrors when I realized that the mirrors were leaning against an entertainment cabinet from the 60's:


You couldn't even really tell what it was - it was facing the wall and had mirrors propped up against it. But once I got it out in the open I could tell it was going to be a winner. And best part? $40 for this baby! It was scuffed up on the top and the back isn't wood (it is some sort of board with holes for cords) but I texted this picture to Amy to see if she liked it:


She said she did and we were off! The doors slide open and closed, which is good because Amy says she's putting diapers and other "not cute" (her words) things in it and she can just close the doors and let it be!

After a false start due to rain, Amy and Andrew came over to our place to paint it. Her nursery colors are based on this inspiration from Apartment Therapy:


(entire nursery from Apartment Therapy found here: http://www.apartmenttherapy.com/post-140-155697)

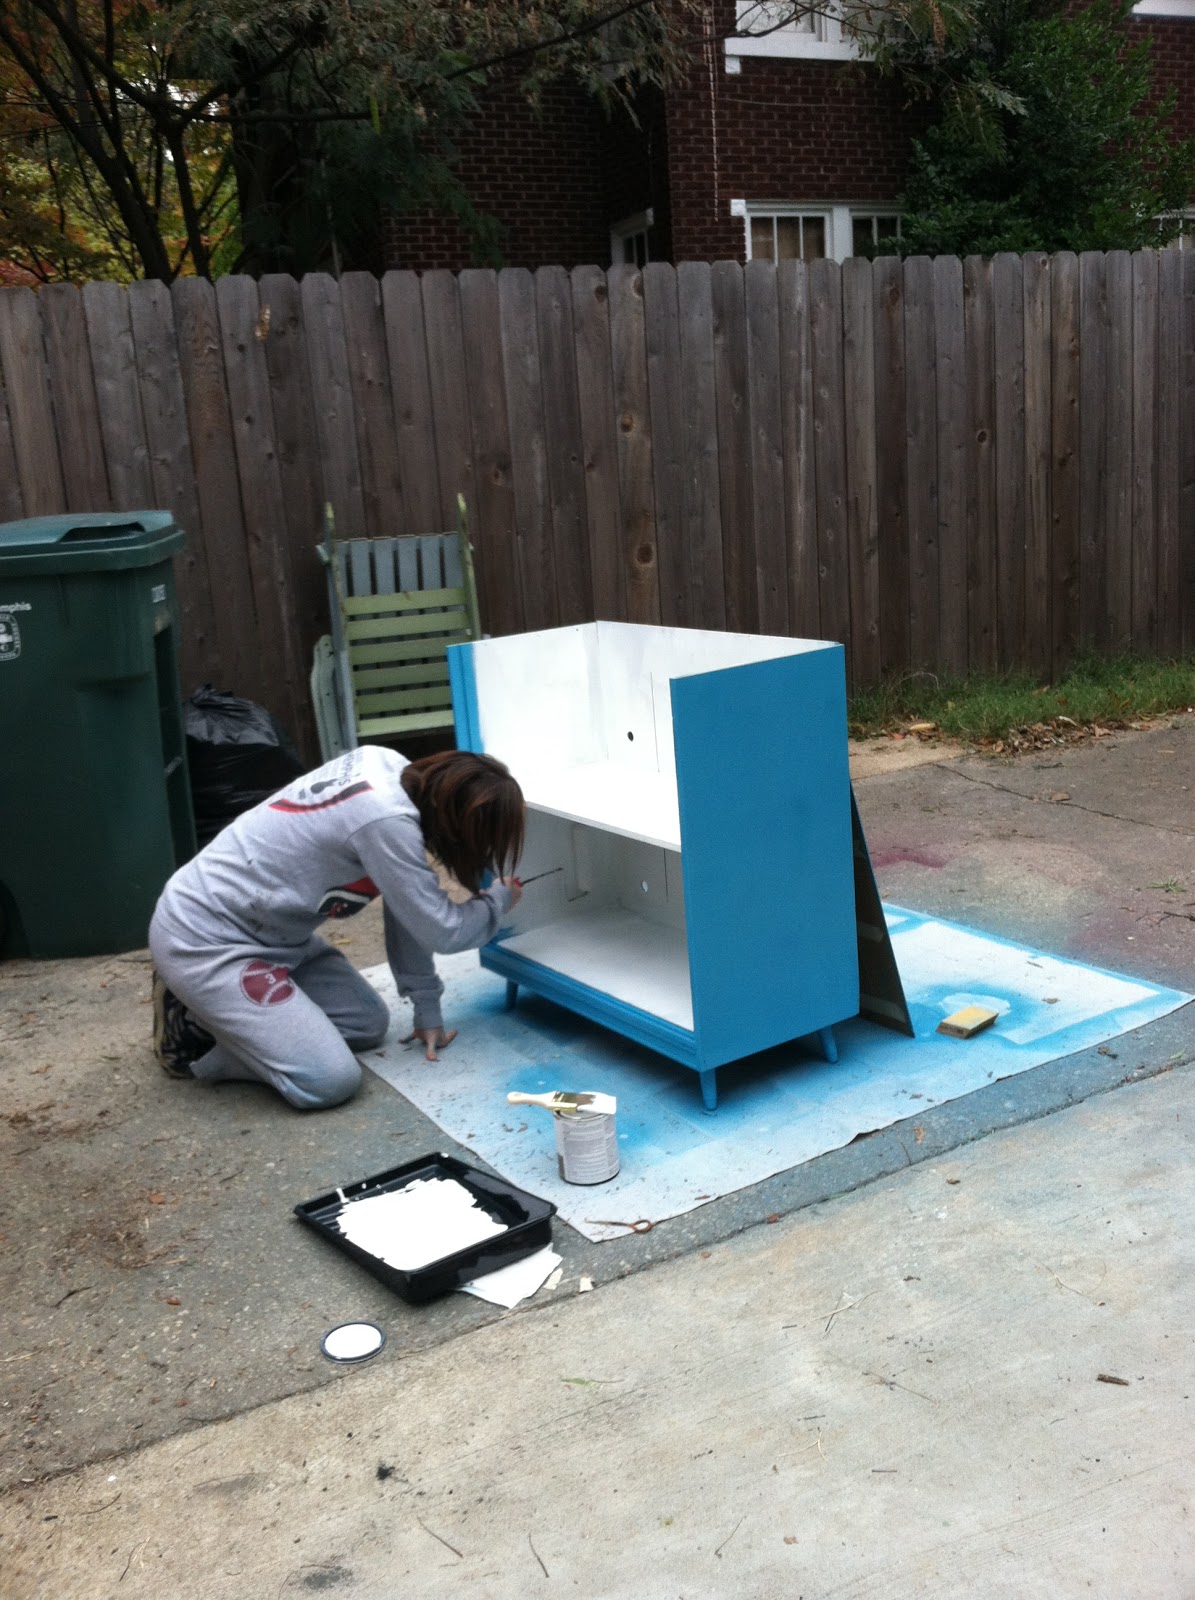
So when it came to picking what color to paint the changing table, she looked to that inspiration and chose turquoise! With their spray paint clothes on (it is worth mentioning that Amy usually does not dress in monotone grey sweat attire - she is very cute!), they got down to business. First they sanded the changing table and took the doors and top off of it.

Then it was time to spray paint. They primed the piece inside and out:


Then gave the first coat of blue. It is important to do thin, even coats when spray painting. And patience is a virtue in life but is especially a virtue in spray painting. Wait for the coat to dry before putting on the next coat. And sand between coats. It really does help even though you feel like you're moving backwards.


As you can tell from the picture above, Andrew had the idea of putting the doors into a circle standing up to get into the groves of the doors.

Time for coat two! (or was it three? or four? we lost count...)


Then once the last coat of the outside was on, it was time to roll paint the inside with white. Andrew wants you to know it was his idea to do the inside white. And what a good idea!


Time for a photo opp! While waiting for the inside first coat to dry, getting a little silly... A good shot of Layla in the belly there!


And all done and ready to go home to the condo... sent it home disassembled for ease of transportation.


And for the final product! Amy texted me this picture of the changing table sans changing pad in its new spot. Amy's mom (my cousin Beth!) gave her the print above it - isn't it the sweetest?


Once the nursery is fully done, Amy (being the photographer that she is) is going to set up lights and do a shoot of the space to document so I'll definitely link y'all to her site once that happens.

Makeover projects are always fun, but they are even more fun when you're doing them with family for a little baby on the way! Proves that if you are patient and creative, nurseries don't have to be cheesy or break the bank.

Now for a little before and after...
                     

In family and fun,

post signature

LinkWithin

Related Posts Plugin for WordPress, Blogger...
 
Site Design By Designer Blogs